Tuesday, April 30, 2013

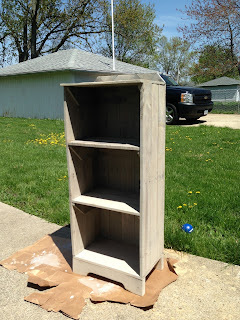
Shelf or "Case" for my Bathroom made from all pallet wood!

So as I said in my previous post I have been working on this shelf I made out of pallets. I found an idea for it on pinterest. It does not look exactly the same way, but my interpretation. I have a huge bathroom in this old house (literally the size of a large bedroom) and I need something to help fill it up as well as be useful. So I seen this post (The inspiration!) on pinterest and thought it would be great for towels and maybe a cute trinket or "what not".

So I started out with two pallets, and if you have taken apart pallets before not all pieces are great and may have a split in the wood ( I use those for other projects). I disassembled the pallet and chose my wood. (And of course I am impatient and like to finish projects as quick as possible and forget to take picks in-between).


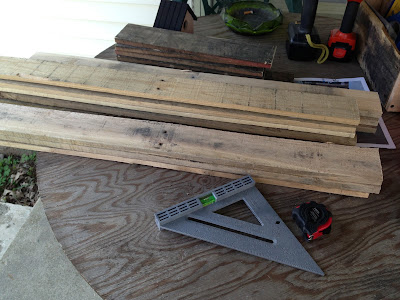
Here is my wood pile for the 2 sides, back, and the dark wood in the back was used for the shelves to rest on. I laid out all of my wood and determined the height of my shelf base on the shortest piece of wood. I then measured the rest of the wood and cut them even with the shortest one. On my case I used 3 pieces on each side and 5 across the back. The two shelves in the center have three pieces. After I put the sides and back together I screwed on the shelves. Then I chose two pieces of wider wood that are usually the end pieces on the pallets for the base, I did the same for the top, leaving an over hang of about 2 inches. I had a gap in the back on the top and I sat staring at it for about an hour when I looked down at my scrap pile and seen the triangles that were cut from the pieces the shelves rest on. So I started playing around with them and this is what I came up with....


For the very bottom I cut two pieces of the pallet that all the boards are attached to. I measured them out so that the arch that is in them was even on both the front and the back. (HINT: Measure twice cut once :) )


Then I sanded it down, this took about an hour and I used my mouse sander (which I love, the sandpaper velcros onto the sander, and a 5 pack of sandpaper costs about $2 at Walmart). 


Afterwards I stained it with "sunbleached" stain. I was trying to go for something that seemed beachy... As I plan on repainting my bathroom soon and want to do a light blue and I think this will be a perfect match. 


I only used one coat of stain and let it sit over night, the next morning I sprayed it with a furniture finishing spray that is clear with no gloss. 


Here she is in the daylight. I love how she turned out ( not sure why I think of it as a she)!


Hope you enjoyed it! If you have any questions feel free to message me and I can give a more detailed explanation. :) 

My little guy insisted on a bird house...

So I have been working on a pallet shelf for the last week and I am nearly done with it. While in the midst of the project I asked my little guy, who is 7, to give me some assistance with some things that I needed more than two hands. After this he insisted on making something himself. I think he was enjoying just playing with the small drill at first but then all of a sudden he got serious :) He is so much like me .... As he began to make his creation he said I must post it on my blog...so here it is. And it is the most adorable bird house I have ever seen, with only a little assistance from mom with wood cuts that he measured.


My handsome little craftsman... ( Don't mind the mess, my porch becomes my work area :)


Hard at work and never smashed a finger once... unlike his mom :)


And the finished product. I love how unique it is. 


So serious!. He did a fabulous job! Now he's already talking about his next project...What will I do with two of us in the house trying to create masterpieces :) I'm sure his will be WAY better than mine. 
Hope you enjoyed my little guys birdhouse! 

Monday, April 22, 2013

Pallet wood projects!

I am really bad at taking before and during pictures. So I have been making things out of pallet wood because I am lucky to have connections and get them free :) So here are some of the projects I have made :
If you have any questions on how just message me.
Sign I made for my bestie!
 Wine bottle and glass wrack. Still needs stained
 Tool caddy so that I can bring all of my tools that I need out at once instead of multiple trips.

Sign I made for my office/craft room... fits perfectly!


Sewing project.... Purses :)

I got an idea to make my own purse a couple weeks ago and once I get an idea and I really want to do it I become really impatient. So, since I lost the cord to my sewing machine and it wasnt working properly the last time I used it, I went and bought a new one...I am spoiled. I chose some thick home interior fabric and picked out a pattern at Walmart that I really liked. Well I am not good at following instructions first time around and if you are a beginner and read those instructions on the pattern you are like me and I have to look up every other word...they should come with a work key! Any ways here is the first one I made...not the greatest but I enjoyed it for a week or two before I decided to make more.

So like I said I decided to make a more...I have made a couple for family and friends and here is the most recent. I made one for my friend and fell in love with the patterns so I had to have one for myself as well :)


Hope you like them :)


Another thrift store project!

I was in need of some lamps and did not want to spend $30+ each on a lamp. So I visited the thrift store again and found two lamps that I liked the shape of but didn't care for their colors. I had a little trouble with one of them so I will post that one after I figure out a way to do it the way I want it. Here is the first I paid $5.50 for the lamp and $6 for the lampshade at Ollie's.
 I liked the center part of the lamp but I hate brass. So I taped up the center part with packing tape and a paper grocery bag. I also wrapped up the cord. Then I took it out away from the house because it was super windy, but the first really warm day. I sprayed one coat of dark brown spray paint. I believe I used Rustoleum. Went back about an hour later and sprayed a second coat and this is how it turned out. I LOVE it! It was hard to get a really good picture of how dark the brown is but I think it turned out great. Hope you enjoy my $15 lamp after paint, lamp, shade.